I apologize in advance if you find this post a little boring.
 Here is a post to prove to you how much of an amateur fisherman I am. I have had a Baitcasting reel and rod for some time and I have used them with quite a bit of success, but only recently have I discovered that Baitcasting reels have a braking system. I never knew it, and because I was catching fish, I never really felt a need to do any research on the subject. I first found out about the braking system because I was watching a video on YouTube by Gene Jensen of the “Flukemaster” YouTube channel. If you get the chance, check him out at Flukemaster.
Gene does a lot of excellent fishing instructional videos and it was his video “How to set up a Baitcasting reel” that brought my ignorance of Baitcasting brakes out into the open. When I discover something about fishing that I don’t know, my curiosity usually gets the better of me and I will research until I am satisfied that I have at least a working understanding of what I wanted to know. I knew I needed to increase my knowledge once I realized I was ignorant of Baitcasting brakes. I read many articles, and watched countless videos on YouTube regarding the Braking systems on Baitcasting reels.
Almost all of the videos tell you what you should be using for your brakes and how to adjust them (i.e. “turn the brakes off and adjust your spool tension so that the lure falls to the floor slowly, then turn a couple of the centrifugal brakes on and the magnetic brakes about 1/2 way and start casting.”). That’s just not enough for me. It’s not enough to give me instructions on how to do something. I like to know WHY I need to do something the way I am instructed.
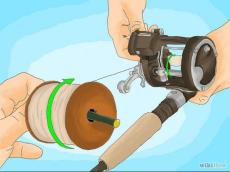 As a simple example… I am told to load a Baitcasting reel with the line coming off the top of the spool of line as opposed to coming up from the bottom of the spool. If I don’t understand the reasoning for it, it is harder for me to accept the information. Of course, in this example it is because the line has a memory and loading it to the reel from the top of the spool will allow reel and line to work together in harmony. Loading it from the bottom of the spool will go against the memory of the line, and then reel and line will be at odds, making backlashes more prevalent.
 The purpose of any braking system on Baitcasting reels is to avoid the dreaded backlash. A backlash is a real pain in the backside as it is a tangled mess inside your reel that usually takes an amount of time to get out, sometimes a long and mostly aggravating time. And let me tell you, if you do it again and again, you will end up throwing your rod in complete frustration.
Well what I learned online and in the videos is that there are usually four different areas that come into play when fishing with a Baitcasting reel. These four areas are; (1) the centrifugal brakes, (2) the magnetic brakes, (3) the spool tension adjustment and (4) thumb. Now, almost every video I watched told me how to adjust each of these parts, but the one thing I didn’t find, was an explanation of what each part actually affects on your Baitcasting reel.
 Centrifugal Brakes: Centrifugal brakes work only during the first part of the cast. Think about what happens when you make a cast. You use your rod to slingshot an amount of weight (lure and line) towards a target. Your spool instantly begins turning at a high rate of speed as your cast sends your bait out into the distance. If your spool is spinning at a greater rate than the lure is traveling, then your line will get loose within the reel and you will end up with a backlash. Think about it like a cooked piece of spaghetti on a plate. Push the spaghetti from one end and what happens? It just bunches up in your plate. But, if the other end of the spaghetti is being pulled by something (the lure weight) at the same rate that you are pushing (the cast) and it will remain straight.
The centrifugal brake is the control that allows the line to feed off of the spool at the same rate of speed as the cast. As the spool is spinning, gravity will make the centrifugal brakes extend from the center of the spool to run along a shelf inside the side panel of the reel. Kind of like the way brake pads work on a drum brake in cars. Most reels will have six such brake pads that you can turn on or off, usually by sliding a small lever for each brake. By locking each individual brake, you are telling the reel how many brake pads to let out to run along the drum. Less brakes equals longer spool turning whereas more brakes will slow down the spool faster. The drawback to the centrifugal brakes is that you MUST remove the side panel of the reel in order to adjust them.
 Magnetic Brakes: On one side of the reel there may be a small dial. Turning the dial one way will decrease the distance of the magnets to the spool and turning the other way will increase the distance between magnets and spool. These are the magnetic brakes. The Magnetic brakes work on the principal that the closer the brakes are to the spool, the faster the spool will slow down within the cast and by default, the further the magnets are from the spool the freer the spool is to spin. The magnetic brakes also only work with the first part of the cast and in principal work the same way as the centrifugal brakes. The difference is that you can easily adjust the magnetic brakes by turning the dial and without having to remove the side plate.
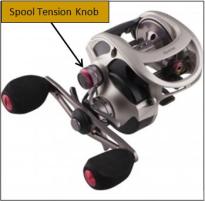 Spool Tension Adjustment: On the same side of the reel as the handle, there will be a small knob that can be turned. This is the spool tension adjustment. This adjustment should never be used as an alternative to the brakes described above. In fact, you can actually damage your reel by using too much spool tension. Whereas the centrifugal and magnetic brakes work with the first part of your cast, the spool tension works with the end of the cast, when the lure stops and the spool keeps turning. The tension adjustment is used to stop the spool shaft at the same time that the lure stops when it hits the water.
 Thumb: All of the above are meant to keep the use of your thumb to a minimum. That doesn’t meant that you won’t use your thumb. On occasion, your cast may get away from you or you may experience a sudden gust of wind that blows your lure back at you. On these occasions when your reel is not set to stop your spool before your lure stops you will need to press your thumb against the spool to stop it and prevent a backlash.
To begin using the brakes;
1 – Adjust the spool tension knob so that it is snug. Hold your rod at a 45° angle. Slowly release the tension of the knob until the lure very slowly begins to drop when you jiggle the rod up and down. This adjustment is actually slightly tighter than you want it to be and this tension will not allow for long casts, but when you first start with a Baitcasting reel it is more important to sacrifice distance in favor of no backlash.
2 – Remove the side plate of the reel and turn four of the six tiny sliding blocks to the OUT position (away from the center) to turn them ON.
3 – If your reel uses magnetic brakes: Turn the adjustment dial on about half way.
4 – Put your thumb on the spool and press the thumb bar to unlock it. Make a cast but be aware at all times in case you need to press your thumb against the spool to prevent backlash. The thumb is actually used only at the very end of the cast, just when the lure is about to hit the water.
Once you get used to casting with no backlash you can readjust the spool tension knob. Again, hold your rod at a 45° angle. Slowly release the tension of the knob until the lure very slowly begins to drop on its own (no jiggling of the rod). When the lure touches the ground, the spool should stop instantly. If it doesn’t, repeat the steps until it does. After you’ve practiced to get a good feel of things, you will gradually be able to reduce the number of brakes you use as well as how much magnetic force is applied. Eventually you will be able to relieve the spool tension until it’s almost completely off.
I hope I have at least helped you understand a little what the brakes on a Baitcasting reel does.
Tight lines, the Amateur Angler


